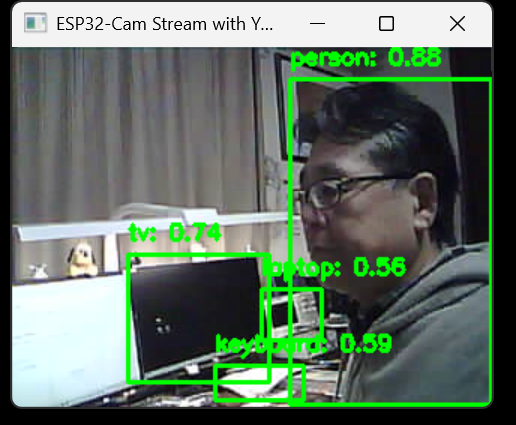
実行結果
ESP32-Camの映像とYOLOの学習データをつかって、Tensorflowが物体認識を行った結果。YOLOでは、認識する領域がbounding boxに囲まれるが、認識対象物体がboxで囲まれ、認識されてているのがわかる。右上にperson:0.88と表示されているが、88%の精度でperson(人)と認識している。
ESP32-CAM側(C++)の設定:
Tensolflowを学習済みデータであるYOLOを使用してESP32のカメラを使い物体認識を行う例である。ESP32にuploadするコードは、Arduino IDEのESP32のexampleにある、CameraWebServer.inoである。注意として、Select Camera Modeの設定を使用するESP32に合わせること。現状 ESP32 WROVERを使用しているので、#define CAMERA_MODEL_WROVER_KIT // Has PSRAMを使用した状態になっている。
このコードでは、http://192.168.3.40に接続することで、静止画、Streamingが確認できる。また、http://192.168.3.40:81/streamで、Steaming画面が表示される。
PCでESP32-CAMのストリーミングを取得し、識別するのは、以下のPython codeである。Thonnyで実行すればよい。
重要な注意:Tensorflowは、Python3.10以下でしか動かないので、ThonnyではPython3.10以下を使用するようにする。複数のPythonのバージョンをインストールできるので、Thonnyで使用時に右下から使用するPythonを選択できるので、3.10以下のものを選択する。同様に、Tensorflow自体をインストールする場合も、3.10以下でないとインストールできない。
#include "esp_camera.h"
#include <WiFi.h>

//
// WARNING!!! PSRAM IC required for UXGA resolution and high JPEG quality
//            Ensure ESP32 Wrover Module or other board with PSRAM is selected
//            Partial images will be transmitted if image exceeds buffer size
//
//            You must select partition scheme from the board menu that has at least 3MB APP space.
//            Face Recognition is DISABLED for ESP32 and ESP32-S2, because it takes up from 15
//            seconds to process single frame. Face Detection is ENABLED if PSRAM is enabled as well

// ===================
// Select camera model
// ===================
#define CAMERA_MODEL_WROVER_KIT // Has PSRAM
//#define CAMERA_MODEL_ESP_EYE  // Has PSRAM
//#define CAMERA_MODEL_ESP32S3_EYE // Has PSRAM
//#define CAMERA_MODEL_M5STACK_PSRAM // Has PSRAM
//#define CAMERA_MODEL_M5STACK_V2_PSRAM // M5Camera version B Has PSRAM
//#define CAMERA_MODEL_M5STACK_WIDE // Has PSRAM
//#define CAMERA_MODEL_M5STACK_ESP32CAM // No PSRAM
//#define CAMERA_MODEL_M5STACK_UNITCAM // No PSRAM
//#define CAMERA_MODEL_M5STACK_CAMS3_UNIT  // Has PSRAM
//#define CAMERA_MODEL_AI_THINKER // Has PSRAM
//#define CAMERA_MODEL_TTGO_T_JOURNAL // No PSRAM
//#define CAMERA_MODEL_XIAO_ESP32S3 // Has PSRAM
// ** Espressif Internal Boards **
//#define CAMERA_MODEL_ESP32_CAM_BOARD
//#define CAMERA_MODEL_ESP32S2_CAM_BOARD
//#define CAMERA_MODEL_ESP32S3_CAM_LCD
//#define CAMERA_MODEL_DFRobot_FireBeetle2_ESP32S3 // Has PSRAM
//#define CAMERA_MODEL_DFRobot_Romeo_ESP32S3 // Has PSRAM
#include "camera_pins.h"

// ===========================
// Enter your WiFi credentials
// ===========================
const char *ssid = "C40FA61150C5-2G";
const char *password = "mr6x6senygdykp";

void startCameraServer();
void setupLedFlash(int pin);

void setup() {
  Serial.begin(115200);
  Serial.setDebugOutput(true);
  Serial.println();

  camera_config_t config;
  config.ledc_channel = LEDC_CHANNEL_0;
  config.ledc_timer = LEDC_TIMER_0;
  config.pin_d0 = Y2_GPIO_NUM;
  config.pin_d1 = Y3_GPIO_NUM;
  config.pin_d2 = Y4_GPIO_NUM;
  config.pin_d3 = Y5_GPIO_NUM;
  config.pin_d4 = Y6_GPIO_NUM;
  config.pin_d5 = Y7_GPIO_NUM;
  config.pin_d6 = Y8_GPIO_NUM;
  config.pin_d7 = Y9_GPIO_NUM;
  config.pin_xclk = XCLK_GPIO_NUM;
  config.pin_pclk = PCLK_GPIO_NUM;
  config.pin_vsync = VSYNC_GPIO_NUM;
  config.pin_href = HREF_GPIO_NUM;
  config.pin_sccb_sda = SIOD_GPIO_NUM;
  config.pin_sccb_scl = SIOC_GPIO_NUM;
  config.pin_pwdn = PWDN_GPIO_NUM;
  config.pin_reset = RESET_GPIO_NUM;
  config.xclk_freq_hz = 20000000;
  config.frame_size = FRAMESIZE_UXGA;
  config.pixel_format = PIXFORMAT_JPEG;  // for streaming
  //config.pixel_format = PIXFORMAT_RGB565; // for face detection/recognition
  config.grab_mode = CAMERA_GRAB_WHEN_EMPTY;
  config.fb_location = CAMERA_FB_IN_PSRAM;
  config.jpeg_quality = 12;
  config.fb_count = 1;

  // if PSRAM IC present, init with UXGA resolution and higher JPEG quality
  //                      for larger pre-allocated frame buffer.
  if (config.pixel_format == PIXFORMAT_JPEG) {
    if (psramFound()) {
      config.jpeg_quality = 10;
      config.fb_count = 2;
      config.grab_mode = CAMERA_GRAB_LATEST;
    } else {
      // Limit the frame size when PSRAM is not available
      config.frame_size = FRAMESIZE_SVGA;
      config.fb_location = CAMERA_FB_IN_DRAM;
    }
  } else {
    // Best option for face detection/recognition
    config.frame_size = FRAMESIZE_240X240;
#if CONFIG_IDF_TARGET_ESP32S3
    config.fb_count = 2;
#endif
  }

#if defined(CAMERA_MODEL_ESP_EYE)
  pinMode(13, INPUT_PULLUP);
  pinMode(14, INPUT_PULLUP);
#endif

  // camera init
  esp_err_t err = esp_camera_init(&config);
  if (err != ESP_OK) {
    Serial.printf("Camera init failed with error 0x%x", err);
    return;
  }

  sensor_t *s = esp_camera_sensor_get();
  // initial sensors are flipped vertically and colors are a bit saturated
  if (s->id.PID == OV3660_PID) {
    s->set_vflip(s, 1);        // flip it back
    s->set_brightness(s, 1);   // up the brightness just a bit
    s->set_saturation(s, -2);  // lower the saturation
  }
  // drop down frame size for higher initial frame rate
  if (config.pixel_format == PIXFORMAT_JPEG) {
    s->set_framesize(s, FRAMESIZE_QVGA);
  }

#if defined(CAMERA_MODEL_M5STACK_WIDE) || defined(CAMERA_MODEL_M5STACK_ESP32CAM)
  s->set_vflip(s, 1);
  s->set_hmirror(s, 1);
#endif

#if defined(CAMERA_MODEL_ESP32S3_EYE)
  s->set_vflip(s, 1);
#endif

// Setup LED FLash if LED pin is defined in camera_pins.h
#if defined(LED_GPIO_NUM)
  setupLedFlash(LED_GPIO_NUM);
#endif

  WiFi.begin(ssid, password);
  WiFi.setSleep(false);

  while (WiFi.status() != WL_CONNECTED) {
    delay(500);
    Serial.print(".");
  }
  Serial.println("");
  Serial.println("WiFi connected");

  startCameraServer();

  Serial.print("Camera Ready! Use 'http://");
  Serial.print(WiFi.localIP());
  Serial.println("' to connect");
}

void loop() {
  // Do nothing. Everything is done in another task by the web server
  delay(10000);
}
PC側(Python)の設定:
Thonnyで実行する。ESP32_STREAM_URL = “http://192.168.3.40:81/stream”と、:81/streamとする必要がある。
Python file
import cv2
import numpy as np
from ultralytics import YOLO

# ESP32-CamのストリームURL(:81/streamを確認)
ESP32_STREAM_URL = "http://192.168.3.40:81/stream"

# YOLOモデルの読み込み(yolov8sを例に)
model = YOLO('yolov8s.pt')  # 自分のモデルがあるならそのパスを指定

# 映像ストリームの取得
cap = cv2.VideoCapture(ESP32_STREAM_URL)
if not cap.isOpened():
    print("Error: Unable to connect to the ESP32-Cam stream.")
    exit()

try:
    while True:
        ret, frame = cap.read()
        if not ret:
            print("Error: Failed to grab frame.")
            break

        # YOLOで推論実行
        # model.predict()で画像を入力すると、物体検出結果が得られる
        # 出力はBoxes形式などで戻り、バウンディングボックス、クラス、信頼度が含まれる
        results = model.predict(frame, verbose=False)

        # resultsには複数フレーム分が入るが、この場合1フレームあたり1結果
        res = results[0]

        # バウンディングボックスの描画
        # res.boxesで検出結果が得られる: [x1, y1, x2, y2, conf, class]
        for box in res.boxes:
            x1, y1, x2, y2 = box.xyxy[0].tolist()
            conf = box.conf.item()
            cls = int(box.cls.item())
            # クラス名はmodel.namesから取得可能
            class_name = model.names[cls]

            # バウンディングボックスを描画
            cv2.rectangle(frame, (int(x1), int(y1)), (int(x2), int(y2)), (0,255,0), 2)
            label = f"{class_name}: {conf:.2f}"
            cv2.putText(frame, label, (int(x1), int(y1)-10), cv2.FONT_HERSHEY_SIMPLEX,
                        0.5, (0,255,0), 2)

        # 映像表示
        cv2.imshow("ESP32-Cam Stream with YOLO", frame)

        # 'q'キーで終了
        if cv2.waitKey(1) & 0xFF == ord('q'):
            print("Exiting...")
            break

except KeyboardInterrupt:
    print("Interrupted by user. Exiting...")

finally:
    cap.release()
    cv2.destroyAllWindows()
    print("Stream closed.")